
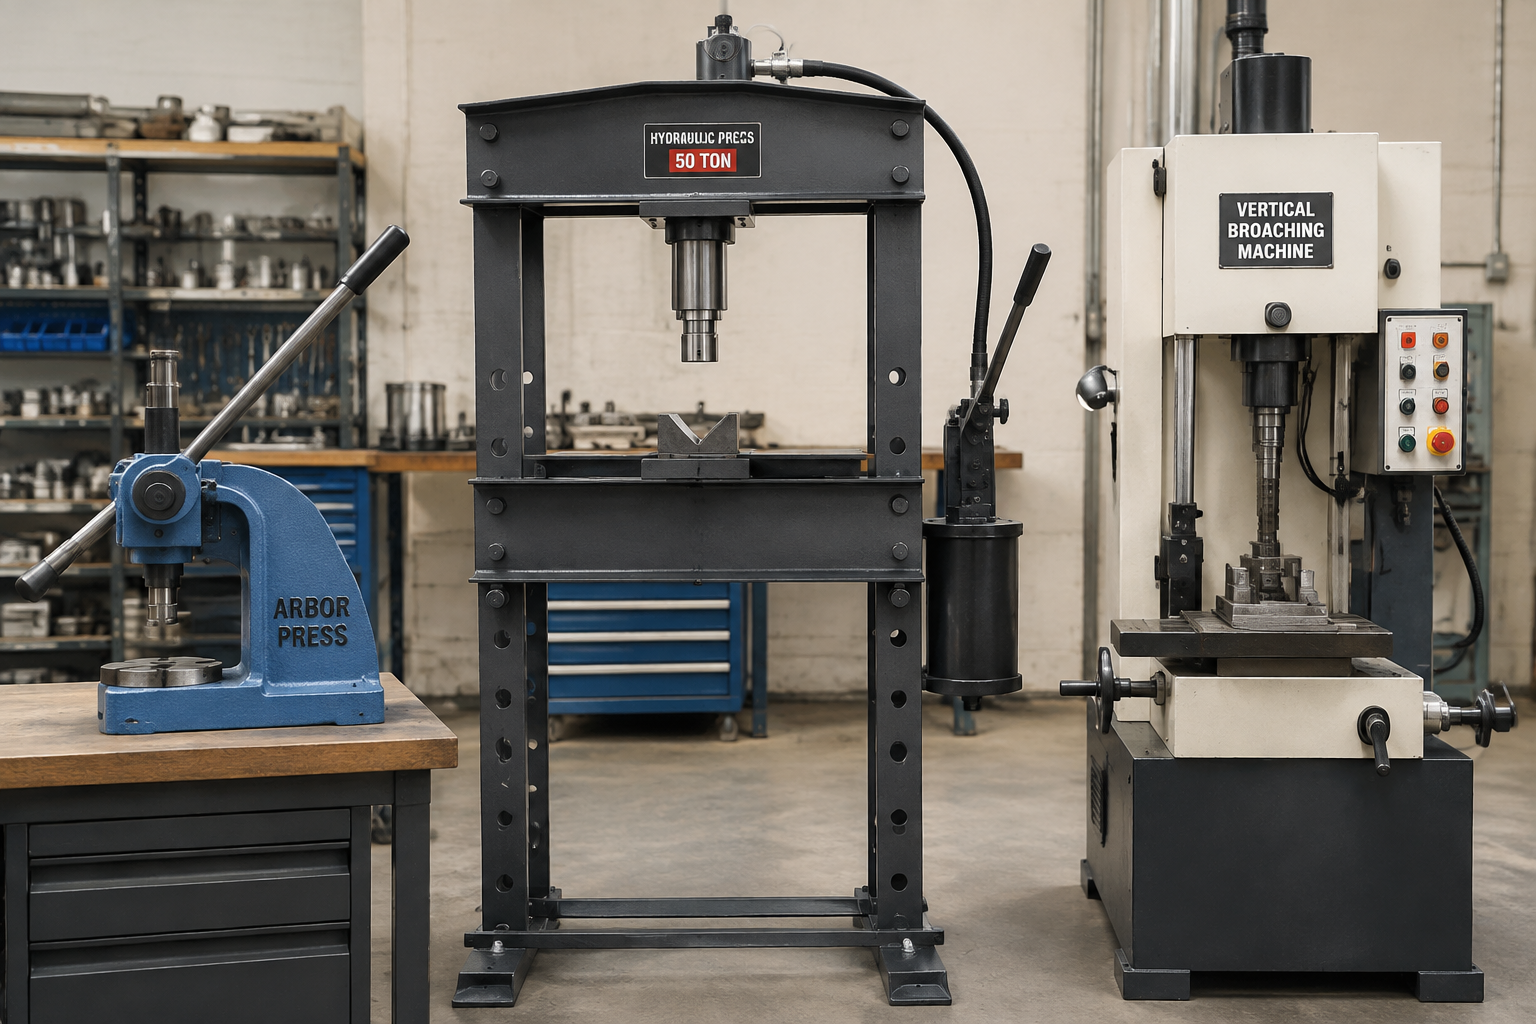
You have a hub with a finished bore, a drawing that calls for a keyway, and a press already standing in the corner of the shop. That combination — an arbor press or a hydraulic shop press, a broach, and a guide bushing — is press broaching — the least expensive door into internal keyway cutting. No CNC, no fixturing a mill, no waiting on an outside machine shop.
What confuses most first-timers is the equipment side: “broaching press” gets used loosely for everything from a $300 ratchet-lever arbor press to a purpose-built keyway machine, and most online content is really about the tooling kits, not the press itself. This guide covers the machine side — what a press needs to broach well, how arbor and hydraulic presses differ in practice, where the tonnage and stroke limits sit, and how to recognize the day your press stops being the right tool.
One piece of housekeeping before we start: our Guida al set di brocciatura per scanalature covers the tooling — broaches, bushings, shims — while this article covers the equipment that drives them. Full disclosure: we build dedicated broaching machines, not press kits, which means we know exactly where press broaching earns its keep and where it runs out of capability. Both are covered straight, without a sales pitch.
What Is Press Broaching?
Press broaching is the use of a shop press — manual arbor press, hydraulic press, or pneumatic press — to push a broach through a workpiece bore and cut an internal form, most commonly a keyway. The process is identical to machine broaching at the cutting edge: a slender, multi-tooth cutter whose teeth rise progressively from front to back, each lifting a thin chip, so the slot reaches full width and depth in a continuous low-force stroke. Nothing about the chip formation changes between a press and a broaching machine.
What changes is the drive direction and the guidance. Most production internal broaching machines pull the broach — tension-loaded, guided by the machine’s own structure. A press pushes it. That makes the broach a loaded column rather than a tensioned cable, which sets two ground rules for every press setup: the broach must be kept short relative to its cross-section (long push broaches buckle), and straightness must come from somewhere other than the machine — which is exactly what the guide bushing provides. The bushing drops into the workpiece bore, its slot steers the broach square and on centerline, and the press contributes the third ingredient: force, applied smoothly along the bore axis.
Force, stroke, and alignment. Every press broaching question — which press, which tonnage, whether to upgrade — reduces to one of those three.
The Broaching Press Spectrum: Three Levels of Equipment
Equipment for press broaching falls along a short, clear spectrum. At the bottom is the manual arbor press — a rack-and-pinion machine that converts a lever pull into 1 to 5 tons of ram force. In the middle is the hydraulic shop press, typically an H-frame machine from a few tons to several dozen tons, where a pump and cylinder replace the operator’s arm. At the top sits the dedicated keyway broaching machine — a small vertical machine built around the broaching cut itself, which is where “press” ends and “broaching machine” begins. The comparison below is the heart of this guide:
| Attribute | Manual Arbor Press | Hydraulic Shop Press | Dedicated Keyway Broaching Machine |
|---|---|---|---|
| Typical capacity | 1–5 tons | A few tons to several tens of tons | Matched to the broach and part family |
| Drive | Rack and pinion, hand lever | Hydraulic cylinder, powered or hand pump | Servo or hydraulic ram, machine-guided |
| Stroke control | Operator feel — speed varies within every stroke | Two-stage: fast approach, slow pressing speed | Programmed, constant cutting speed |
| Keyway per part | Minutes — multi-pass with shims, manual chip clearing | Minutes — still multi-pass, less operator effort | Seconds — single pass to full depth, auto return |
| Consistency | Operator-dependent stroke by stroke | Good, limited by manual loading and alignment | Machine-repeated, part after part |
| Cost level | Hundreds of dollars | Low four figures | Capital equipment — tens of thousands and up |
| Best fit | Occasional keyways, repair work, small bores | Larger keyways, harder material, deeper keyseats | Production volumes, tight repeatability |
Between the manual and hydraulic tiers sits a smaller option worth knowing: the pneumatic press. Air-over-oil and straight pneumatic shop presses deliver a few tons at the push of a button, removing the lever fatigue of repeated arbor press work while keeping the small footprint. For shops with compressed air that only cut small keyways — 1/8″ to 3/16″ slots in mild steel — it is a legitimate middle path; beyond those light cuts, the hydraulic press takes over.
Manual Arbor Press Broaching: The Entry Point
An arbor press is a mechanically simple machine: a steel rack carrying the ram, driven by a pinion gear turned by a long lever. The lever-to-rack gearing is the entire force multiplication — a one-ton press turns a modest pull at the handle end into a ton of controlled thrust at the ram. That simplicity is why arbor presses last generations and why they remain the default host for keyway broaching sets.
In a typical keyway job, the workflow runs: seat the guide bushing in the workpiece bore with its slot aligned to the keyway position, drop the oiled broach into the bushing slot, square the assembly under the ram, and drive the broach through in one smooth, uninterrupted stroke. Clear the chips, add a shim behind the broach, and repeat passes until the keyseat reaches drawing depth. The full tooling sequence — bushing fit, shim arithmetic, and size selection — is covered in our Guida al set di brocciatura per scanalature; this article stays on the press.
What the arbor press demands is stroke discipline. The ram speed is literally your arm, so the broach teeth see whatever feed rate you happen to produce. Uneven feed means uneven chip load per tooth: walls tear instead of shearing, force spikes, and a dull broach announces itself as a lever that suddenly gets hard to pull. The skill is committing to one smooth velocity through the cut — never easing off mid-stroke and re-loading a partially cut tooth.
The limits are physical and well-defined. Capacity tops out around 5 tons at the practical end of hand operation, capping keyway size and material hardness. Stroke is fixed by the rack travel, so broach-plus-shim stacks must fit within it — check before buying any set. And repetition is the real ceiling: a hundred identical keyways is a hundred repetitions of identical technique, and technique drifts over an eight-hour shift in a way machine motion does not.
Hydraulic Press Broaching: Force and Control
A hydraulic press replaces the lever with a pump and cylinder, and that swap changes press broaching in three specific ways: more force, controlled speed, and less operator variability. Typical shop H-frame presses run from a few tons up to several tens of tons — enough headroom for wider keyways, harder alloys, and deeper cuts per pass that would stall an arbor press cold.
Speed control is the underrated advantage. Better hydraulic presses offer a two-stage cycle: a fast approach stroke that closes the ram to the work quickly, then a slow, governed pressing speed for the cut. That second stage matters more than the first. A constant, low feed rate loads every broach tooth uniformly — precisely what a hand lever cannot deliver — producing cleaner keyway walls, more predictable force, and better tool life between sharpenings. When comparing presses for broaching, the governed pressing speed rating deserves more attention than the peak tonnage badge.
Tonnage selection follows the same math as machine broaching. Broaching force climbs with material hardness, keyway width, and depth removed per pass — the calculation is identical whether the ram is pushed by a cylinder or pulled by a machine, and we lay out the full method in our broaching tonnage calculation guide. Two press-specific notes from practice: size the press with margin over the calculated force, because a press at its limit moves slowly and heats up; and remember the multi-pass shim scheme exists partly to keep each pass inside small-press force limits — the same reason it exists on arbor presses.
Return stroke and tool handling are where hydraulic setups get practical. Single-acting presses return the ram by spring or gravity, which works but leaves the broach sitting in the cut workpiece until you retract it by hand. Fit a retainer or pressure plate on the ram — a simple shop-made plate that drives the shank down and pulls it back up — so the tool travels with the ram instead of being fished out of every part. And check the bolster before the first job: the press bed needs an opening large enough for the broach and its chips to pass through, or the stack has nowhere to go.
Tooling on a Press: The Bushing Does the Machine’s Job
A press has no guideways worth the name, no spindle alignment, no way to keep a broach square to a bore on its own. Every bit of geometric accuracy in press broaching comes from the guide bushing. It slips into the workpiece’s finished bore, and its internal slot — cut to match the broach width — steers the tool along a straight path, square to the bore axis, correctly on centerline, for the full stroke. Skip it or mismatch it and the broach wanders, tilts, or cuts a keyway off-center relative to the bore. There is no press technique that compensates for a wrong bushing.
The selection rules carry over unchanged from the tooling side: bushing OD matches the workpiece bore as a close-sliding fit, and the bushing slot pairs with the specific broach. Those rules, plus shim-based depth control and set combination math, are laid out in our Guida al set di brocciatura per scanalature — the same tooling logic applies whether the drive is a hand lever or a hydraulic cylinder.
On the press side, one more piece of shop hardware matters: the press plate. This is a hardened plate with a central opening that sits on the press bed and supports the workpiece around the bore while letting the broach and chips pass through. It takes the downward force off the workpiece edges, keeps thin hubs from deflecting, and gives the bushing collar a flat seat. A scrap-plate improvisation under a loaded broach is a common source of tilted setups and wrecked keyseats; a proper plate is a one-time purchase that removes the problem.
Press Broaching Safety: Chip, Ram and Broach
Press broaching concentrates a lot of stored energy in a small area. Four disciplines cover the failure modes:
- Broken-broach protection. A broach is a long, hardened, pre-stressed piece of steel. If one snaps under load, the pieces release that energy instantly and do not choose a direction. Face shield or safety glasses are non-negotiable, and a sheet-metal guard around the work zone on repeated production runs is cheap insurance.
- Workpiece support. The part must sit fully on the press plate or bolster — never held by hand, never balanced on the bushing alone. A poorly supported part tips as force builds, the broach binds sideways, and binding is how broaches break.
- Hands out of the strike zone. Obvious for any press work, but broaching adds a lure: the temptation to steady a wobbling part or brush a chip while the ram is loaded. Chips get cleared with a hook or brush, between passes, with the ram retracted.
- Alignment before force. A broach started even slightly off-square concentrates the entire cut load on one row of teeth. Square the bushing-broach-workpiece stack under the ram before pressure builds, not by correcting mid-stroke.
Most press broaching accidents trace back to a small set of root causes — chip re-entry, dull tools forced through, misalignment, unsupported parts. We break down the full chain of failure mechanisms and countermeasures in how to avoid broach breakage; if you run a press regularly, that logic is worth internalizing before a broken tool pays for the lesson.
When the Press Stops Being Enough
Every press broaching setup eventually meets one of three walls, and each one points to the same exit.
Volume. Press broaching is a minutes-per-part process — multi-pass, manual chip clearing, manual shimming, manual loading. Once keyway work occupies a press and an operator for a meaningful share of every week, the labor arithmetic flips against it. A dedicated machine cuts the same keyway in a single pass to full depth in seconds, with automatic broach return, and does not fatigue at hour seven.
Repeatability. When inspection starts chasing keyway symmetry or width variation that traces back to setup rather than tool wear, the operator-dependent part of press broaching has become the process bottleneck. A machine-guided broach removes that variation at the source — the same teeth, in the same sequence, at the same speed, on every part.
Force and geometry. Keyways beyond the press’s tonnage, broach stacks beyond its stroke, or part families needing non-standard widths all push past what catalog sets and shop presses were built for. That is custom tooling and machine territory.
The machine side of that decision — vertical versus CNC versus keyseater, cycle planning, the full upgrade checklist — is what our keyway broaching machine guide covers in depth. The short version: presses suit dozens of parts, machines suit thousands, and the honest test is annual labor hours at loaded rates versus machine investment over its service life.
Domande frequenti
What is a broaching press?
It is a shop press used to drive a broach through a workpiece bore to cut an internal form, most often a keyway. In practice the term covers manual arbor presses (1–5 tons), hydraulic shop presses (a few to several tens of tons), and, used loosely, small dedicated keyway broaching machines. The cutting principle matches machine broaching — progressive multi-tooth removal — with the press pushing rather than pulling the tool, and a guide bushing providing the alignment the press itself cannot.
Can you use an arbor press for broaching?
Yes — it is the standard entry point, provided three conditions hold. The press must have enough capacity for the cut (small keyways in mild steel suit 1–3 tons; larger keyways and harder steels push toward the 5-ton end or into hydraulic territory). Its stroke must cover the broach length plus shim stack. And the setup must use a guide bushing matched to the bore and broach — without it, nothing holds the cut straight. Within those conditions, an arbor press and a keyway set cut clean, accurate keyseats indefinitely.
How much pressure does broaching require?
It depends entirely on keyway width, material hardness, and depth removed per pass — a 1/8″ slot in mild steel is a small arbor-press job measured in fractions of a ton, while a 1/2″ keyway in alloy steel can demand a substantial hydraulic press. Because the same force calculation governs presses and machines alike, run your actual numbers with our broaching tonnage calculation guide rather than sizing from a rule of thumb.
What is the difference between press broaching and a broaching machine?
Direction, guidance, and cycle structure. A press pushes the broach with stroke accuracy and alignment coming from the bushing, in a multi-pass, shim-based, manually handled process measured in minutes per part. A broaching machine pulls a purpose-ground broach along a rigid, machine-guided path, cutting the keyway to full depth in a single pass with automatic return — seconds per part, repeatable shift after shift. Press broaching is the low-volume, low-investment entry; the machine is the production answer. The full equipment comparison is in our keyway broaching machine guide.
From Press to Production
A broaching press setup earns its place honestly: minimal investment, tooling that fits in a drawer, and keyways cut this afternoon instead of next week. Its constraints — force, stroke, and operator-dependent consistency — are just as honest, and they announce themselves clearly when volume grows.
When that day comes, the step up is well-marked: our pagina dedicata alla macchina per la brocciatura di scanalature shows the dedicated verticals and CNC configurations we build, and the broader broaching machines overview covers the full range for internal and surface work. Send us a part print and your annual volumes — our engineers will review the geometry, size the machine and tooling package, and give you the cycle time to expect in production.


