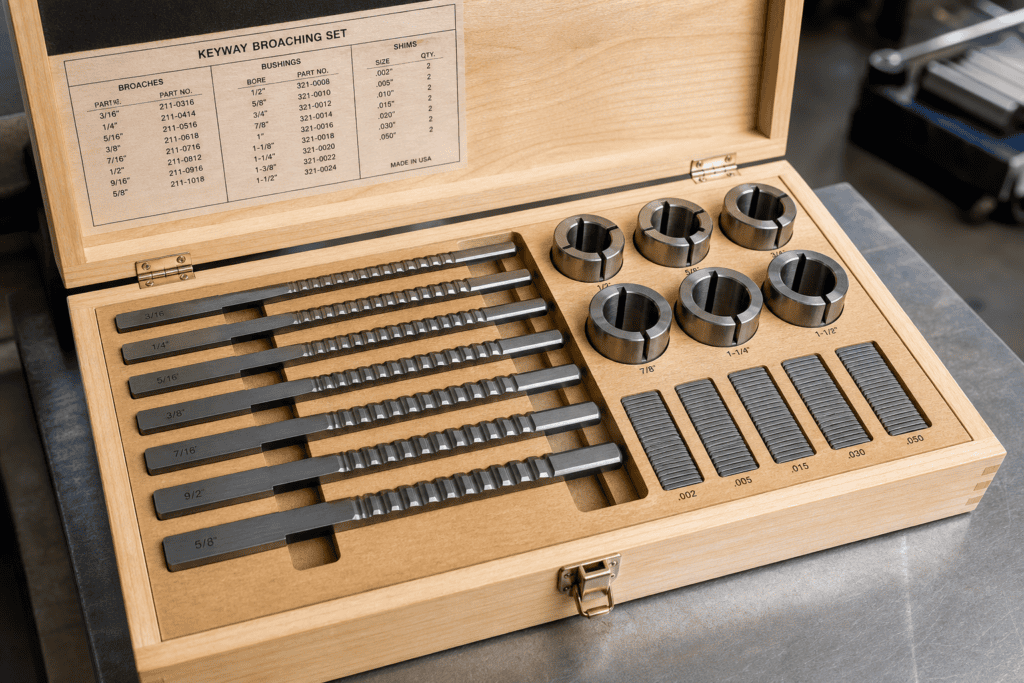

You have a gear, pulley, or sprocket with a finished bore, and it needs a keyway. If there is already an arbor press or a hydraulic shop press in the corner of your garage or maintenance room, a keyway broaching set is the fastest path from bare hole to finished keyseat — no CNC, no waiting on an outside machine shop.
Search for a keyway broach set, though, and you land almost entirely on product listing pages: an 18-piece set here, a 9-piece metric kit there, a single Style B broach for a few hundred dollars. What those listings rarely explain is how the pieces work together, which sizes you actually need for your parts, or where a hand-press kit stops making sense. This guide closes that gap — components, inch and metric sizing, a five-step selection method, and an honest look at the limits of set-based broaching.
Full disclosure: we build broaching machines and custom broach tools, not hobby press kits. That also means we know exactly where those kits earn their keep and where they run out of capability — both are covered below without a sales pitch.
What Is a Keyway Broaching Set — and Who Is It For?
A keyway broaching set is a matched collection of tooling for cutting internal keyseats — the axial slot inside a hub that a parallel key engages to transmit torque — using nothing more than a shop press. Three component types do all the work:
- Keyway broaches — the cutters themselves, one per keyway width, each a slender HSS blade with a progression of teeth.
- Guide bushings — sleeved collars that drop into the workpiece bore and steer the broach along a straight, correctly positioned path.
- Shims — thin steel plates stacked behind the broach so one tool can cut the keyseat to full depth over several passes.
The economics of the set are simple: broaches are expensive, bushings and shims are cheap, and one broach can serve many bore diameters when it’s paired with the right bushings. A typical 18-piece set breaks down to roughly 4 broaches, 9 bushings, and 5 shims; even a compact 9-piece kit can cover on the order of 15 broach-and-bushing combinations. That combination math is the entire point of buying a set rather than pieces.
Who uses them? Three overlapping groups. Home shop machinists cutting keyways in pulleys and drive components on a 1- to 3-ton arbor press. Maintenance and repair shops — the people broaching a keyseat into a replacement sprocket at 2 p.m. so the line runs again by 3. And small-batch producers running dozens or a few hundred parts per month, where a press-based process beats fixturing a mill for every changeover. For an introduction to the underlying process, see our keyway broaching complete guide; this article focuses specifically on the tooling kits.
Component 1: The Keyway Broach
The broach is the cutting member: a flat, parallel-sided blade with teeth along one edge that grow progressively taller from front to back. Each tooth removes a thin slice of material — the rise per tooth, typically a few thousandths of an inch — so the keyseat reaches its full width and depth in one continuous, low-force stroke rather than one deep, tool-breaking cut. Along its length you’ll find a shank for the press ram or retainer to engage, a pilot section, roughing teeth that remove the bulk of the material, and finishing teeth at full height that set the final keyway width and wall finish.
Keyway broaches for press work come in two common designations, and the difference trips up first-time buyers:
- Type A — cuts a keyway at standard single key width (1/8″, 3/16″, 1/4″, 5/16″, 3/8″, 1/2″ in inch sizes; 2–25 mm in metric coverage). This is what most sets contain and what most parallel-key assemblies call for.
- Type B — a wider broach cutting roughly double the Type A keyway width for the same bore, used for heavier torque transmission, custom wide keys, or where two adjacent passes must be blended. Single Type B broaches from industrial distributors commonly run in the mid-$500 range, which is why they’re usually bought individually rather than as part of a starter kit.
Nearly all catalog keyway broaches are made from high-speed steel (M2-class HSS), which holds a keen edge at cutting temperatures, tolerates the interrupted, chip-loaded conditions of a hand-fed press, and can be resharpened several times over its life. Broach length scales with keyseat depth and the number of finishing teeth, so a set’s largest broach is also its longest — check your press stroke before you commit.
Component 2: The Guide Bushing
The bushing is the least glamorous part of the set and the one most often bought wrong. Its job is guidance: it slips into the workpiece’s finished bore, and its internal slot — cut to the broach’s width — keeps the broach square to the bore axis and located on centerline for the entire stroke. Without it, there is nothing to keep a press-driven broach from wandering, tilting, or cutting a keyway that’s off-center relative to the bore.
Two rules govern bushing selection. First, the bushing OD must match the workpiece bore — this is a close-sliding fit, not “close enough.” A bushing 0.005″ small lets the broach rock and produces a tapered or off-center slot; one too large simply won’t enter. Second, the bushing slot must match the broach: slot width sets keyway width, so bushings are paired to specific broaches. This pairing is why kit combination counts (one broach, many bushings) matter more than raw piece counts when you compare sets.
Bushings come in two body styles. Collared bushings have a flange that seats on the workpiece face; the collar keeps the bushing from sliding into through-bores and gives the broach a defined start. Plain (straight) bushings have no flange and are used where the bore geometry or fixture doesn’t allow a collar — for example, in blind or counterbored holes where a flange would sit above the surface and tilt the setup. Sets aimed at general shop work lean on collared styles; check which you’re getting.
Component 3: The Shims
A keyway broach cuts to one fixed depth per pass — the height of its finishing teeth above the bushing slot floor. To reach a standard keyseat depth, you run multiple passes and place a shim between the broach back and the bushing slot for each successive pass. Each shim lifts the broach by its thickness (commonly on the order of 0.015″–0.060″ per shim depending on the set), advancing the cut one increment at a time until the measured depth is reached.
The multi-pass scheme is a deliberate trade. It keeps each broach short enough for a shop press stroke, keeps cutting forces low enough for a 1- to 5-ton press, and lets one broach serve several depth targets. The cost is time and a little technique: chips must be cleared from the slot between passes, and depth must be checked rather than assumed. A typical set includes 4–6 shims per broach size; if your keyseat is deep relative to bore size, verify the shim count actually gets you there before you start.
Keyway Broaching Set Sizes: Inch and Metric Systems
Inch sets cover the common parallel-key widths from 1/8″ through 1/2″. Metric keyway broach sets are cataloged by keyway width from 2 mm to 25 mm, with matching bushings spanning bores from roughly 6 mm to 72 mm in a full-coverage kit. The keyway width you need is not a free choice — it is set by the shaft diameter and the torque the connection must carry, standardized in ANSI B17.1 (inch) and DIN 6885 / ISO (metric). The table below shows typical pairings to orient your selection:
| Keyway Width | Typical Matching Bore (Hub) | Typical Use |
|---|---|---|
| 3 mm (~1/8″) | 8–10 mm | Small pulleys, instruments, light duty |
| 4 mm | 10–12 mm | Small sprockets, stepper-drive components |
| 5 mm | 12–17 mm | General light power transmission |
| 6 mm (~1/4″) | 17–22 mm | Common workshop and conveyor duty |
| 8 mm (~5/16″) | 22–30 mm | Gearboxes, pumps, medium torque |
| 10 mm (~3/8″) | 30–38 mm | Industrial gearing, couplings |
| 12–14 mm | 38–50 mm | Heavier drives, flywheels |
| 16–20 mm (~3/4″) | 50–75 mm | High-torque, large-flange components |
Two practical notes on sizing. Mixed-unit shops should resist cutting a “close enough” metric keyway with an inch broach or vice versa — a 1/4″ (6.35 mm) broach in a 6 mm application cuts the slot 0.35 mm oversize, leaving the key loose enough to rock. And bore coverage is the hidden variable: a broach without a bushing to match your bore is unusable, so when comparing sets, list your actual part bores first and check them against the bushing lineup — not the broach lineup.
How to Choose the Right Keyway Broaching Kit: 5 Steps
Work through these five steps in order and the kit selection collapses from “which of thirty listings” to “the one that matches my parts.”
- Step 1 — Measure the workpiece bores. Record the actual finished bore of every part family you’ll broach, to the nearest 0.001″ / 0.01 mm. These diameters drive the bushing list, and the bushing list eliminates most candidate sets immediately.
- Step 2 — Fix the keyway width. Derive it from the shaft diameter and torque requirement per ANSI B17.1 or DIN 6885 — don’t guess wide “for safety,” because an oversized keyseat weakens the hub and mismatches off-the-shelf keys.
- Step 3 — Check bushing coverage. Cross-reference Steps 1 and 2: every bore needs a bushing whose slot matches the chosen broach. Count real combinations, not advertised piece counts.
- Step 4 — Estimate keyseat depth and shim count. Standard keyseat depth (measured from the bore wall) is roughly a third of key width for many common sizes, but verify against the standard. Divide by shim increment and confirm the included shims reach full depth on your largest keyway.
- Step 5 — Confirm press capacity. Broaching force climbs with keyway width, material hardness, and depth per pass. A 1/8″ keyway in mild steel is a small arbor-press job; a 1/2″ keyway in alloy steel can demand a substantial hydraulic press. Run the numbers with our broaching tonnage calculation guide before you buy, not after the ram stalls mid-cut.
One more check that belongs on the list: press interface. The broach shank needs to be driven or retained by your specific press — arbor press rams use threaded or slotted retainers, and hydraulic presses often need a simple pressure plate. Verify the shank size in the kit listing against what your press will actually accept.
Using a Keyway Broaching Set: The Process at a Glance
The press workflow condenses to five moves: seat the bushing in the workpiece bore with its slot aligned to the keyway position; insert the broach teeth-up through the bushing slot with cutting oil on the teeth; support the workpiece square to the ram and drive the broach through with a smooth, uninterrupted stroke; clear chips and re-oil; then add a shim and repeat until depth is reached. Inspect the finished keyseat for width, depth, and squareness to the bore with a key or gauge block before releasing the part.
That’s the overview this article has room for. Setup details, chip control, lubrication practice, workholding options, and troubleshooting drifted or scored keyways are covered in full in our keyway broaching complete guide.
HSS Broach Material, Care, and Resharpening
Set broaches in M2-class high-speed steel, properly used, last for years of intermittent work. “Properly used” means three habits. Keep the cut flooded or brushed with cutting oil — dry broaching galls the keyway walls and dulls teeth prematurely. Clear every chip between passes — a chip re-entering the slot is the classic cause of scored walls and broken teeth. Store broaches so the teeth can’t contact other tools; tooth edge damage from rattling around in a drawer is the most common self-inflicted wound in press broaching.
Dull broaches announce themselves: rising press force, torn or burnished keyway walls instead of clean shear marks, and dimensional drift toward oversize width. HSS keyway broaches can typically be resharpened several times before stock is exhausted, and knowing when that service is due — rather than pressing a tired tool until it breaks inside an expensive gear — is worth real money. We cover the signals and economics in detail in when to resharpen a broach tool.
Where Sets End and Production Broaching Begins
A keyway broaching set is the right tool for exactly the scenario it was built for: standard keyway widths, through-bores, tolerances measured in thousandths, and volumes from one piece to a few hundred. The design decisions that make a kit affordable — standard key widths, bushing guidance instead of a dedicated fixture, shim-based multi-pass depth on a manual press — are also its ceiling. Recognize the point where you’ve hit it:
- Volume. Multi-pass hand broaching takes minutes per part. Production rates in seconds require a machine-fed process.
- Non-standard geometry. Special key widths, dual keyways, splines, or deep keyseats beyond shim reach all fall outside catalog broach territory.
- Difficult features. Blind keyseats, tapered bores, or thin-wall parts that won’t tolerate bushing guidance need dedicated tooling — see our coverage of blind keyway broaching for how those cases are handled.
- Consistency demands. When every part must index to the same depth and symmetry with statistical certainty, operator-dependent press work becomes the weak link.
The upgrade path runs through two doors, and they’re ours: a custom broach tool designed for your specific keyway, material, and tolerance — including special widths and multi-pass-free full-depth designs — and a dedicated keyway broaching machine that replaces press technique with rigid, repeatable strokes. And to be clear about the honest case: if your annual volume is a drawer full of repaired sprockets, stay with the set. It’s the right tool. The time to talk custom is when the press queue starts dictating your schedule.
Frequently Asked Questions
What are the different types of keyway broaches?
Press-type keyway broaches divide first by key width system (inch Type A sizes 1/8″–1/2″, or metric 2–25 mm) and second by width class: Type A cuts a standard single-width keyway, while Type B cuts approximately double that width for high-torque or custom-key applications. Beyond press broaches, production broaches include single-pass full-depth keyway broaches for dedicated machines, dual-keyway broaches that cut two slots 180° apart in one stroke, and concentric designs that cut the bore and keyway simultaneously. An overview of the full range lives in our broach tools pages.
How to broach a keyway?
Insert the guide bushing into the part’s bore, slip the oiled broach into the bushing slot, square the assembly under the press ram, and drive the broach through in one smooth stroke. Clear chips, add a shim behind the broach, and repeat passes until the keyseat reaches the depth called out on the drawing, checking with a gauge block or test key. The full procedure — setup, alignment, lubrication, and troubleshooting — is in our keyway broaching guide.
Can you rotary broach a keyway?
No. Rotary broaching cuts rotationally symmetric internal forms — hexagons, squares, splines with constant cross-section — by wobble-cutting on a lathe or mill spindle, and it cannot produce an axially extended slot with a flat floor like a keyway. Keyways require linear broaching (press or machine) or milling. If you’re weighing the two processes, our rotary broaching explainer covers what rotary tooling can and cannot do.
How to broach a tapered keyway?
For a slight taper, press broachers approximate it with a shim sequence that reduces cut per pass along the length, though the result is a stepped approximation, not a true taper, and fit will be imperfect. Genuine tapered keyways — the kind found in tapered bores — call for a tapered keyway broach that matches the bore’s specific taper angle, usually run on a broaching machine with the workpiece fixtured to the taper axis. This is custom tooling territory; it’s one of the standard cases where a set-based approach is out and a purpose-made broach is in.
Choosing a keyway broaching set comes down to a short checklist: your bores, your keyway width per the standards, bushing coverage, shim depth, and press force. Get those five right and even the smallest kit will cut clean keyseats for years — and when volume or geometry eventually outgrows it, you’ll know exactly which requirement moved.