
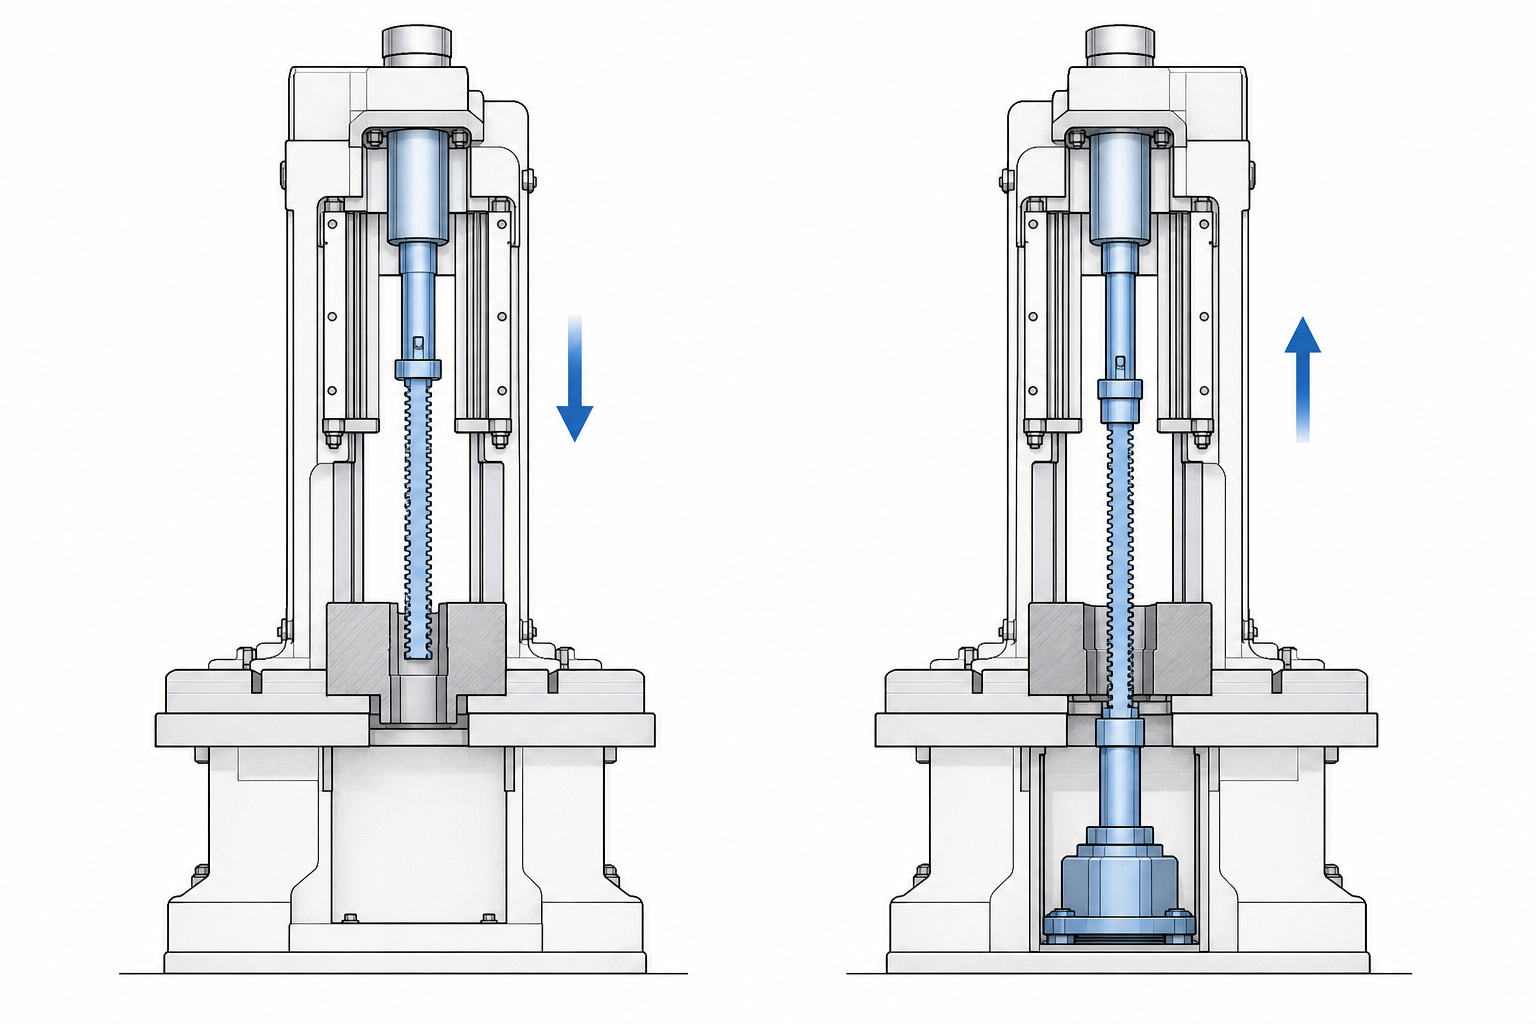
Few metalcutting processes are as decisive as broaching: one straight stroke of a multi-tooth tool takes a raw bore or blank surface to a finished keyway, internal spline, hex socket, or contoured face. No tool changes, no second setup, no alternating roughing and finishing passes. On production floors worldwide, the machine that delivers that stroke is most often a vertical broaching machine.
This guide is written for manufacturing engineers and buyers who need the machine itself explained: how it works, the configurations you will meet on spec sheets and equipment listings, the specifications that actually drive selection, and what operation, safety, and maintenance demand day to day. We close with the buying decision—new versus used, and what sourcing directly from a vertical broaching machine manufacturer looks like in practice.
What Is a Vertical Broaching Machine?
A vertical broaching machine is a machine tool that clamps a long, multi-tooth cutting tool—a broach—to a slide traveling on a precise vertical path, and drives that tool through or across a workpiece in a single pass. Each tooth on the broach stands slightly taller than the one before it, so the teeth share the load progressively: roughing teeth remove the bulk of the material, semi-finishing teeth bring the form close, and the last teeth size and finish it. The result of one stroke is a complete, accurate form.
The vertical layout earns its popularity on three practical points. Footprint: the machine grows upward rather than outward, so even a long broach works within a compact cell. Chip handling: gravity pulls chips out of the cut, and coolant flushed from above carries them down and away. Ergonomics and automation: parts load and unload at a convenient station height, which suits operators and pick-and-place loaders alike.
This article focuses on the machine itself. For the cutting process in detail—rise per tooth, chip formation, tolerance capability, and the internal-versus-external distinction—read our companion guide: What Is Vertical Broaching?
How a Vertical Broaching Machine Works
Whatever the brand or configuration, every vertical broaching machine is assembled from the same core elements:
- A base and column that anchor the machine and resist cutting forces
- A slide (ram) riding on precision ways, which carries the tool or part through the stroke
- A workhead at the slide face that holds the broach
- A work table and fixture that locate the part relative to the tool
- A drive—classically a hydraulic cylinder, increasingly a servo ballscrew—that moves the slide
- A control that manages approach, cutting speed, return, and safety interlocks
A typical internal cutting cycle runs as follows. The part is placed in the fixture, which locates it against a face and a pilot so the bore sits square to the broach path. The slide rapids toward the part, shifts to cutting speed as the broach pilot enters the bore, and draws the tool through in one continuous pass. At the end of the stroke the feature is finished; the slide retracts, the part is unloaded, and the next cycle begins. Because the broach does all roughing and finishing in one pass, cycle time is essentially stroke length divided by cutting speed, plus part handling.
Two families of work happen on these machines. Internal broaching cuts forms inside a pre-machined hole: keyways, straight and helical splines, hexagons, squares, and combination profiles. Surface broaching cuts the outside of the part: flats, slots, steps, and contours. The machine types in the next section exist because these families, and the part sizes that come with them, favor different mechanics.
Types of Vertical Broaching Machines
Vertical broaching machines are classified first by how the tool meets the work—pull-up, pull-down, push-type, or surface—and then by ram configuration: single-slide or twin-slide. Learn these five labels and you can read any manufacturer’s catalog or used-equipment listing with confidence.
Pull-Up Machines
In a pull-up machine, the part is seated at the lower station and the broach rises through it from below, finishing its stroke high in the machine. That puts the loading position low—exactly where automation wants it. Gravity-fed chutes, bowl feeders, and simple pick-and-place units can present parts to a pull-up machine with minimal guarding complexity, and the low station keeps an operator’s posture neutral across a shift.
Pull-up machines are the natural fit for short parts—sockets, small hubs, fittings, hand-tool components—where part length needs no support through a long stroke and cycle rate matters more than versatility.
Pull-Down Machines
The pull-down configuration is the most common vertical layout in general service. The broach hangs from the upper slide, the part rests on the work table face, and the slide draws the tool down through the part in one pass.
Two consequences drive its popularity. Chips and coolant fall away from the cut naturally, keeping the broach clear and the part clean. And because the part is supported on the table through the stroke, longer and heavier workpieces—gears, sprockets, shaft hubs with long internal splines—cut stably. If you specify one machine for a mixed portfolio of internal work, it will almost always be a pull-down.
Push-Type Machines
Push broaching inverts the tool’s loading: a short, stout broach is pushed into or through the work in compression rather than pulled in tension. Compression invites buckling, so push broaches are kept short relative to their diameter and the cuts stay light—resizing or truing an existing bore, cutting a short keyway, or adding a form at a second operation. Push-type vertical machines are compact, inexpensive, and fast to retool, which makes them useful as secondary-operation equipment beside lathes and machining centers rather than as front-line production broaches.
Vertical Surface Broaching Machines
Where the types above cut inside holes, a vertical surface broaching machine cuts the outside of the part. A sectioned surface broach—often carrying carbide inserts—is bolted along the face of the slide, and the workpiece is fixtured on the bed below. As the slide descends, the broach planes the exposed faces of the part, producing flats, steps, slots, and contoured profiles in a single pass. Surface machines dominate where external forms are large and tolerances tight—connecting rod and cap mating faces, steering knuckles, and similar structural components—and force ratings run well above those of internal machines for comparable part sizes because the total width of cut is larger.
Single-Slide vs. Twin-Slide Machines
Independent of the pull/push/surface classification, the machine has one slide or two. A single-slide machine cuts, retracts, and waits for the next part: smaller footprint, simpler maintenance, and a price that suits job shops and medium-volume cells. A twin-slide machine carries two rams that alternate—while one slide makes its cutting stroke, the other retracts and reloads—yielding nearly twice the output of a same-capacity single-slide machine in high-volume production, at the cost of a larger, more complex machine. The rule of thumb: single-slide saves space and capital; twin-slide buys throughput.
The table below summarizes the five configurations at a glance (twin-slide being a ram option available across several of the other types):
| Configuration | Tool motion | Part handling | Sweet spot |
|---|---|---|---|
| Pull-up | Broach rises through the part from below | Loads at a low station; suits feeders and loaders | Short parts, automated cells |
| Pull-down | Broach descends through the part | Part supported on the table through the cut | General and heavier internal work |
| Push-type | Short broach pushed through in compression | Compact bed, quick changeover | Light forms, sizing, second operations |
| Vertical surface | Sectioned broach planes the outside of the part | Part fixtured on the bed | External flats, slots, and contours |
| Twin-slide | Two rams alternate cutting and return | Load one station while the other cuts | High-volume, high-rate production |
Vertical vs. Horizontal Broaching: Where Each Layout Wins
In one sentence: choose vertical for compact floor space, natural chip evacuation, and small-to-medium internal parts; choose horizontal when the stroke or broach is very long, or when parts are too large or heavy to handle comfortably on a vertical axis. Both layouts use the same broaches and cut to the same standards—the decision is about the parts, the building, and the material handling. Because the trade-offs deserve more than a sentence, we treat them in full in Unterschied zwischen horizontaler und vertikaler Räummaschine.
How to Select a Vertical Broaching Machine: The Specification Checklist
Machine selection is a chain of decisions that flows from the part print. Work through the list below in order and the candidate list narrows itself.
- Pull force (tonnage). Everything starts here. Required force follows from material strength, total cut width, chip load per tooth, and the number of teeth in the cut at once. Undersize the machine and the cut stalls or the drive overloads; oversize it and you pay for capacity you never use. Derive the requirement from your worst-case part—the method is in How to Calculate Broaching Machine Tonnage.
- Stroke length. The stroke must accommodate broach length, part height, and approach and overrun clearances. Broaches for new parts keep getting designed—size the stroke to the longest form you can foresee, not merely today’s product line.
- Tool interface. Quick-change workheads let a trained operator swap broaches between parts in minutes, which matters in job shops. Traditional flange mounts are robust and simple and remain common on dedicated production machines. Match the interface to your changeover reality.
- Drive technology. Hydraulic drives deliver high force at moderate cost and are proven over decades; servo-driven machines add programmable speed profiles, cleaner and quieter operation, and better energy efficiency at the cost of more upfront complexity. The trade-offs are compared in Servo vs. Hydraulic Broaching Machine.
- Control. A basic PLC handles start, stop, and speed. A CNC control stores part programs, manages index and automation stations, logs process data, and integrates with plant systems. Controls are hard to retrofit—buy the level your factory will grow into.
- Workholding and automation. Fixtures, index units for multiple keyways, auto-load and unload, part-presence sensing, chip conveyors, and coolant filtration decide whether the machine produces at its potential. Budget them as part of the machine, not as afterthoughts.
- Footprint and utilities. Confirm floor space, foundation or vibration requirements, power, and—for hydraulic machines—cooling water against your facility before the order, not after delivery.
For a structured selection process that weighs configuration alongside these parameters—and includes horizontal and special-purpose machines—read How to Choose the Right Broaching Machine.
Operating a Vertical Broaching Machine: Setup to First Part
Broaching rewards disciplined setup. A standard first-run sequence:
- Mount and indicate the fixture so its pilot axis is parallel to the slide’s travel; clamp and record the position.
- Install the broach in the workhead and verify full seating—an improperly seated shank loads the machine inaccurately and can damage the tool.
- For parts with multiple features, set and verify the index mechanism so each keyway or slot is cut on station.
- Set cutting speed and, on hydraulic machines, system pressure per the broach supplier’s data.
- Run the first article and measure it fully: keyway width and depth, spline measurement over pins, profile, and surface finish. Approve against the print before releasing the lot.
- Verify coolant delivery at the cut and through the fixture; confirm chips are evacuating, not packing.
In production, attention shifts to sampling and to the machine’s condition signals: surface finish drifting, burrs rising, or the drive working harder usually mean a dull or damaged broach tooth rather than a machine fault. Pull the broach, inspect it under magnification, and re-sharpen or replace it rather than forcing the cut.
Typical Parts Produced on Vertical Broaching Machines
Vertical broaching is invisible in finished products but everywhere in the parts that make them work. Typical production parts include:
- Internal splines in gears, sprockets, and driveline components
- Keyways in pulleys, couplings, hubs, and flywheels
- Hexagon and square sockets in hand tools, fittings, and fastener heads
- Steering knuckles and chassis components with broached flats and slots (surface machines)
- Connecting rod and cap mating faces (surface machines)
- Pump rotors and bodies with vane slots and internal keyways
- Power-transmission and firearm components where forms repeat at volume
Workpiece materials span steels and cast irons through nonferrous alloys; harder or gummier alloys simply demand more force, sharper tool geometry, and better coolant. The common thread across all of it: a repeating internal or external form, produced at rate, to tolerances that hold across thousands of parts because the broach—not a programmed axis path—defines the geometry.
Safety and Maintenance Essentials
A broaching machine moves relatively slowly but with very high force, and its tooling is razor-sharp. The rules that keep operators whole:
- Keep guards, doors, and light curtains in place and functional; interlocks are not conveniences.
- Never reach into the work zone during a cycle, even for a “quick” chip clear.
- Handle broaches with cut-resistant gloves and support long tools at both ends during installation.
- Inspect broaches for chipped or broken teeth before mounting; one damaged tooth marks every part in the lot.
- Clear chips with hooks and brushes, never bare hands; deburr parts at a separate station.
On the maintenance side, vertical broaching machines are forgiving if they are kept clean, lubricated, and monitored:
- Check hydraulic oil level and condition on schedule; sample for contamination rather than waiting for symptoms.
- Lubricate slide ways per the manual—stick-slip in the slide shows up directly in part finish.
- Record system pressure at the same point in a reference cycle; drift signals seal or pump wear.
- Re-torque workhead and fixture mounting bolts on a set interval.
- Maintain coolant concentration and filtration; dirty coolant accelerates broach wear.
These are the highlights. A complete task-by-task schedule is in our Broaching Machine Preventive Maintenance Checklist.
Buying a Vertical Broaching Machine: Price, New vs. Used, and Manufacturers
A vertical broaching machine price is driven first by capacity—tonnage and stroke—then by drive technology, control level, and automation content. Two machines that look similar in a listing can differ sharply once the real project cost is counted: broaches, fixtures, and change parts are a meaningful share of any broaching project, and they are usually new even when the machine is not.
The used market is deep and the value can be real, but it demands homework: slide ways, cylinder or ballscrew condition, control vintage, and spare-parts availability all decide whether a bargain stays one. We compare the inspection points and total-cost math in Used vs. New Broaching Machine.
For many buyers the strongest path is buying new, factory-direct from a vertical broaching machine manufacturer. Chinese builders in particular have made that route routine: you work with the engineering team that builds the machine, so custom stroke, capacity, table size, and fixtures are normal engineering requests rather than expensive change orders, and machine, broaches, and workholding can be supplied and debugged as one matched package. Machines span the full practical range—from light benchtop-class units for second operations to heavy-duty production machines—and lead times are typically measured in weeks rather than a machine-tool season.
That is how we work at broachingmach.com: we design and build vertical broaching machines and supply the matched broaches and fixtures alongside them. Standard models and their specifications are on our vertical broaching machine product page, and engineering review of your part prints is part of the quotation, not an extra.
Häufig gestellte Fragen
How does a vertical broaching machine work?
A multi-tooth broach is clamped to a slide that travels on precise vertical ways. The part is located in a fixture directly in the tool’s path; the slide advances, the broach enters the bore or meets the surface, and a single continuous stroke pulls the teeth through the work. Each tooth removes a thin slice, and the tooth heights step up to the finished form—so the keyway, spline, hex, or surface is complete at the end of one pass. The slide retracts, the part is exchanged, and the cycle repeats.
What is the purpose of a broaching machine?
To produce precise internal or external forms faster and more repeatably than processes that generate the same geometry pass by pass. A keyway cut on a machining center needs multiple passes and dedicated programming; a broach produces it in one stroke, with the form built into the tool itself. That makes broaching machines the standard answer for repeating features at production volume—gears, hubs, hand tools, automotive and pump components.
What are the different types of broaching machines?
By orientation: vertical and horizontal. Within vertical machines: pull-up, pull-down, push-type, and surface configurations, plus single- and twin-slide ram layouts. The wider family also includes horizontal surface machines and special designs such as continuous (chain-type) broaching machines for very high volumes. The types section of this guide covers the vertical family in detail.
How does a rotary broach tool work?
Rotary broaching cuts polygons—hexagons, squares, serrations—on a lathe or machining center rather than on a broaching machine. The broach is held at a slight tilt (about one degree) to the workpiece axis and is free to rotate; as the spinning part meets the wobbling tool, each tooth takes a small shearing cut, generating the full polygon in seconds. For the geometry, tooling, and application notes, see What Is Rotary Broaching?
The Bottom Line
Pick the configuration from the part: pull-down for general internal work, pull-up for short parts feeding automation, push-type for light second operations, surface machines for external forms, and twin-slide when volume justifies it. Size tonnage and stroke from the worst-case print, not the average one. Choose the drive and control for the factory you will have in the coming years, not just the one you have today. And buy from a supplier who stands behind the broaches as well as the machine, because in broaching the two are one system—if that matches your project, start with the tonnage calculation above or send us a print, and we will quote machine and tooling together.


