
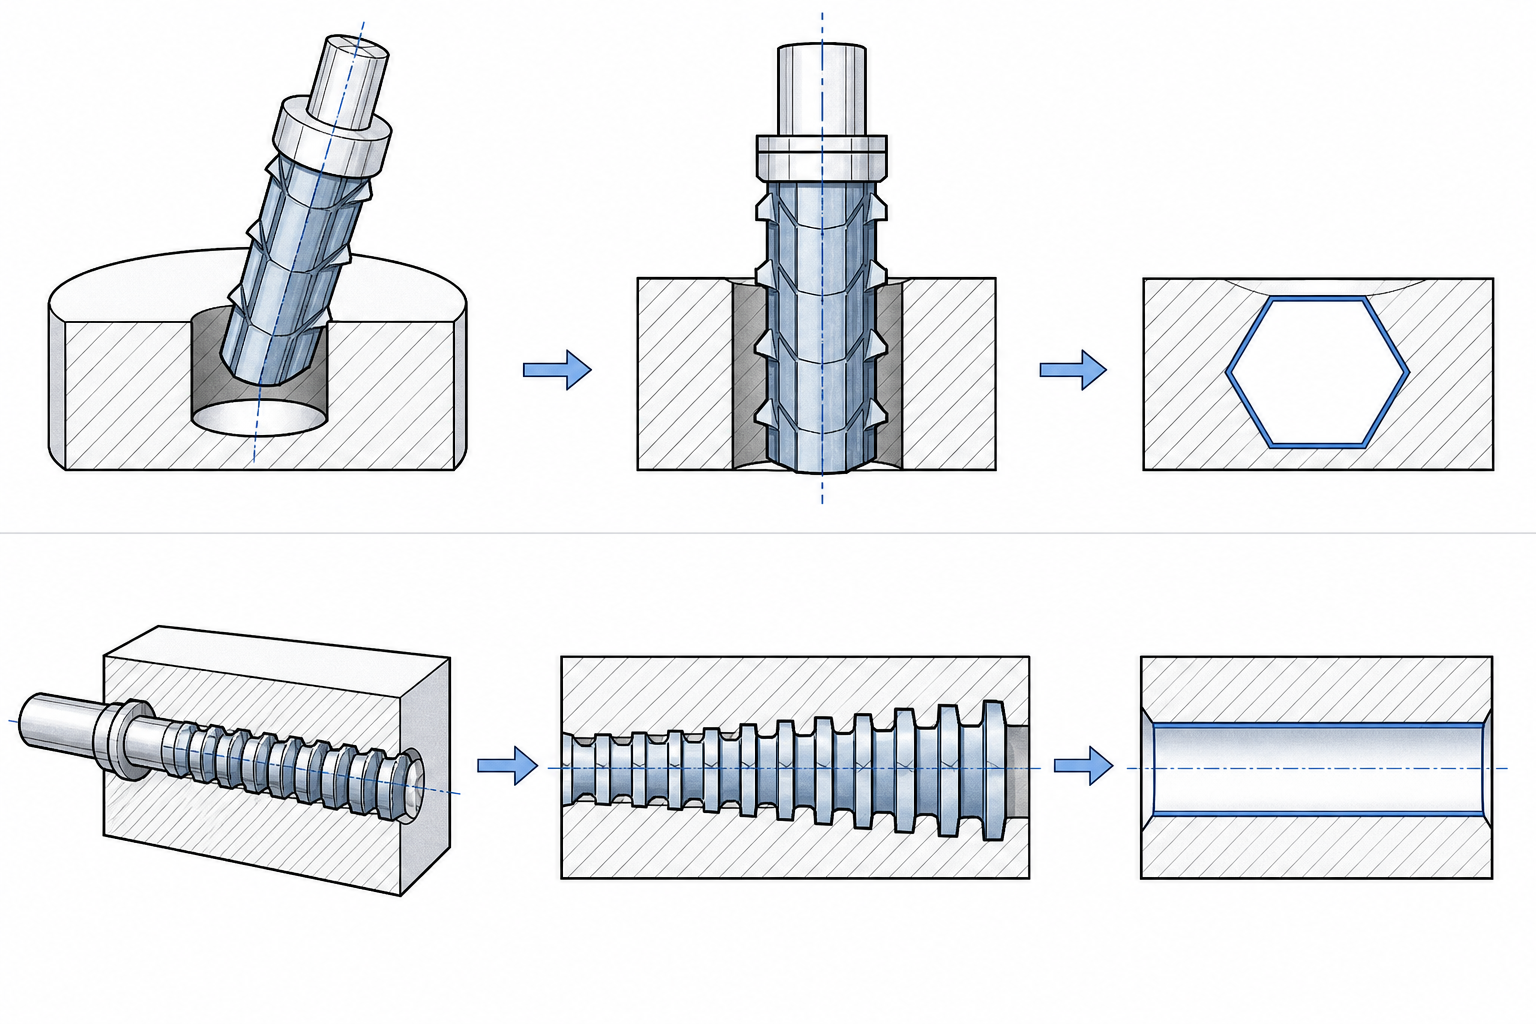
If you need a hexagon, square, serration, or keyway form inside or along a workpiece, you generally have two families of processes to choose from: rotary broaching (also called wobble broaching) performed on an existing lathe or mill, and conventional broaching (linear broaching) performed on a dedicated broaching machine. Both cut internal and external polygon forms, and both can hold precision in the 0.0005″ class in a well-controlled setup. But they sit at opposite ends of the spectrum in equipment cost, lot-size economics, and geometric capability.
This guide compares the two processes side by side: how each cuts, what equipment each requires, where each one’s capability ceiling sits, and which real-world parts typically go each route. If you are deciding between a rotary broaching kit for your machining center and a dedicated broaching machine for a production part, the decision framework below will map your batch size, form depth, and shape to the right answer. For a refresher on the fundamentals of the broaching process itself, start with our primer on what broaching is.
What Is Rotary (Wobble) Broaching?
Rotary broaching is a machining method for producing polygon forms—most commonly hexagons and squares, but also Torx-style forms, serrations, and keyways—on a standard lathe, mill, or machining center. A form tool called a rotary broach is mounted in a special holder that holds the broach at a 1-degree lean angle relative to the spindle axis. Because of that engineered tilt, the broach wobbles as the spindle rotates, and only one corner of the tool engages the workpiece at any instant.
That is the entire cleverness of the process: instead of pushing a full-profile form tool into the hole and asking it to cut on its entire perimeter at once, the 1° angle converts the form into a series of light, corner-by-corner shearing cuts. The hex or square is generated one corner at a time while the tool feeds in a single pass. The operator drills a round pre-hole slightly larger than the form’s across-flats dimension, then drives the rotating broach into it—the polygon emerges complete in one stroke, typically within the same workpiece setup as the turning or milling operations around it.
Rotary broaching requires no dedicated machine. That single fact drives almost all of its advantages: no capital equipment purchase, no transfer of the part to a second machine, no re-clamping, and no loss of concentricity between the pre-hole and the finished form. The trade-off is a strict geometry ceiling, which we quantify in the comparison table below.
What Is Conventional (Linear) Broaching?
Conventional broaching—often called linear broaching to distinguish it from the rotary method—removes material with a long, multi-toothed cutting tool called a broach. The broach is either pulled or pushed through or across the workpiece in a single linear stroke on a dedicated broaching machine. Each tooth on the broach stands slightly taller than the tooth before it; that increment is the tooth rise. As the broach advances, each tooth shaves off one thin layer of material, and the finished full-depth form is generated progressively, tooth by tooth, in one pass.
Broaching machines come in vertical and horizontal configurations, and in pull-type and push-type variants depending on whether the broach is tensioned or compressed during the cut—we cover the trade-offs in our comparison of push broaching vs pull broaching. Likewise, machines are built for internal versus external broaching machines (internal splines, keyways, polygon holes) or external work (surface contours, fir-tree slots, hexagons on shaft ends). The unifying idea is that a machine tool is purpose-built around one motion: a long, rigid, straight-line stroke with high force capacity.
Because the machine and the broach are both engineered for one specific part family, conventional broaching is the defining high-volume form-making process. A complete spline or keyway forms in seconds, tolerances repeat part after part, and a single broach can serve tens of thousands of workpieces before regrinding. The cost of that productivity is capital: machine plus custom tooling engineered per part.
Cutting Mechanism: 1-Degree Shear Angle vs Progressive Tooth Rise
The deepest difference between the two processes is not the equipment—it is how chip load is created.
Rotary broaching cheats the chip load geometrically. The broach itself has no tooth progression along its length; the full form profile exists on its cutting end. The 1° holder angle means the tool’s axis and the workpiece axis are deliberately misaligned, so as the tool rotates, its cutting edge sweeps into and out of engagement like a wobbling cone. Only a small sliver of the cutting edge is active at any moment, shearing one corner of the polygon at a time. Chip thickness stays low without any relief ground into the tool profile. This is why a compact, single-piece form tool can cut a complete hexagon without stalling the spindle.
Linear broaching engineers the chip load into the tool. The broach is a stack of progressively larger profiles. Roughing teeth take heavier rises, semi-finishing teeth take lighter ones, and the final few teeth are pure finishing teeth that set the form’s size, surface finish, and geometry. Chip load per tooth is a designed variable, not a geometric side effect—which is why a pull broach can remove large volumes of material in a deep spline slot in a single stroke while still finishing the flanks to spec. The broach also carries chip breakers and gullet space sized for the material and slot width, so chip evacuation is engineered rather than incidental.
Practical consequence: rotary broaching is limited by how much form the wobbling shear can reasonably generate—shallow to moderate depths on small-to-medium forms. Linear broaching is limited by broach length, machine stroke, and tonnage—which are all money problems rather than physics problems, and can therefore be scaled up almost without limit by larger machines and longer tools.
Equipment Requirements and Capital Investment
Rotary broaching needs only what most shops already own. The shopping list is a rotary broach holder for your turret, spindle, or tool holder, plus one form tool per polygon size. Standard catalog broaches—common hex and square sizes in M-2 or powder-metal (PM) high-speed steel—cover the majority of applications. A starter setup (holder plus a set of broaches) lives in the low-four-figure dollar range. If your lathe or machining center can turn a true hole, you can rotary broach.
Conventional broaching requires a dedicated machine—vertical or horizontal, sized by stroke length and force capacity for your part family—plus a custom-engineered broach for each distinct part number. A production broaching machine is a six-figure-dollar-class capital asset before tooling. The per-part economics invert at volume: once the machine and broach are amortized across tens or hundreds of thousands of parts, the cost per form approaches seconds of machine time plus fractions of a cent of tool life—a level no general-purpose process can match.
This asymmetry is the heart of the rotary-vs-linear decision. Rotary broaching converts an existing machine into a form-making machine for the price of tooling. Conventional broaching buys unmatched per-part speed at volume for the price of a machine line. Our guide on how to choose the right broaching machine walks through the tonnage, stroke, and configuration questions that follow once you have decided a dedicated machine is justified.
Rotary vs Linear Broaching: Capability Comparison Table
| Dimension | Rotary (Wobble) Broaching | Conventional (Linear) Broaching |
|---|---|---|
| Forming depth | Roughly 2× the broach diameter is the practical ceiling for a sound form | Limited by broach length and machine stroke/tonnage—deep splines and slots are routine and scalable |
| Shape and size | Small-to-medium internal hex, square, Torx-type forms, serrations, keyways | Large cross-sections: internal and external splines, internal gears, deep keyways, irregular profiles |
| Material range | Free-machining and low-alloy steels, stainless, aluminum, brass, and similar; harder grades erode tool life quickly | Broad; with hard broaching practices the process extends into hardened work above roughly 50 HRC |
| Accuracy | 0.0005″-class achievable; concentricity depends on pre-hole quality and spindle alignment | 0.0005″-class achievable; geometry governed by broach manufacturing accuracy, tooth pitch accumulation, and side relief |
| Cycle time and batch size | Form cut in seconds inside the machining cycle; strongest at prototypes through medium batches | Complete form in one stroke measured in seconds; built for high-volume production |
| Per-part cost curve | Near-flat and low at small volumes—no setup premium beyond tool change; high labor share per part at volume | High below the break-even lot size; falls steeply with volume as machine and tooling amortize |
| Tooling cost and life | Catalog broaches in M-2 / PM high-speed steel; re-sharpenable; per-size cost is modest | Custom-engineered broaches represent real tooling investment but serve tens of thousands of parts per grind cycle |
| Workholding and secondary operations | Cut in-cycle on the lathe or mill—no re-clamping, no part transfer, form stays concentric with prior operations | Part moves to the broaching machine and a dedicated fixture; a separate operation unless tooled as a cell |
Two rows deserve emphasis. First, depth: the roughly 2×-diameter limit on rotary broaching is not a rule you can negotiate with a better tool—it follows from the wobbling shear geometry itself. A part needing a deep hex or a long spline engagement simply cannot be rotary broached economically. Second, the per-part cost curves cross: rotary broaching is cheaper per part until the lot gets large, after which the dedicated machine’s speed and amortized tooling win decisively. The crossover point depends on your labor rate, cycle times, and form geometry, but every shop that runs both processes has one.
Typical Parts: What Goes to the Lathe vs What Goes to the Broach
Parts that routinely go the rotary broaching route share a profile: small-to-medium polygon forms, shallow to moderate depth, produced on parts that are already being turned or milled. Classic examples include:
- Screwdriver and bit shanks—square and hex drives formed in handles and mating components
- Medical bone screws and implants—hex and hexalobular drive sockets in small-diameter titanium and stainless parts
- Hydraulic and pneumatic fittings—hex forms in tube and hose end fittings machined complete on a bar-fed lathe
- Firearm components—buffer components and other small parts with internal driving forms
- Knobs, collars, and shaft ends—squares that mate with handles or drive components
The common thread is that these forms are small enough to live within the 2×-diameter envelope and that the parts are machined complete elsewhere anyway—so the form rides along in the same cycle for essentially zero additional handling.
Parts that go to a dedicated broaching machine are the ones that break the rotary envelope in depth, section size, or volume:
- Steering knuckles and steering yokes—spline forms with engagement lengths far beyond any rotary broach
- Gear blanks and transmission components—internal splines and internal gears cut to class fit in one pass
- Crankshafts—keyways and other straight-side forms
- Connecting rods—high-volume precision forms produced by the millions on transfer broaching lines
- Turbine discs—fir-tree blade-root slots, the textbook example of forms only linear broaching can produce
Decision Framework: Choosing Between Rotary and Linear Broaching
Strip away the details and the decision reduces to four questions, asked in order:
- Does the form fit the rotary envelope? Internal hex/square-class shape, roughly within the 2×-diameter depth limit, in a machinable material? If no—deep forms, large cross-sections, internal gears, long splines—you need a broaching machine. Stop here.
- What is the real annual volume? Prototype through low-to-medium production: rotary broaching on your existing lathe or machining center is almost always the economic answer.
- Is takt time driven by the form operation? At high volumes, the seconds-per-stroke economics of a dedicated machine—plus the labor saved by not tying up a machining center—tip the scale to linear broaching.
- Is the part already machined complete elsewhere? If the workpiece is bar-fed or fixtured on a mill, the in-cycle rotary operation adds the form with zero extra handling—the strongest single argument for wobble broaching.
Many manufacturers land on a hybrid path, and it is a legitimate strategy rather than a compromise: rotary broach the form during prototyping and early production—no tooling lead time, no capital—while the design is still changing; then, once volumes justify it, release a custom broach and transfer the feature to a dedicated machine. The part prints stay identical, and the rotary tooling remains on the shelf for rework lots and engineering builds. Shops that expect this transition should tolerance the form with the production process in mind from day one, since a tolerance the rotary process can only barely hold will transfer poorly to volume production.
Accuracy and Quality Considerations for Each Process
Both processes are precision processes—0.0005″-class accuracy is achievable in either—but they earn it through different disciplines.
With rotary broaching, everything starts with the pre-hole. The polygon is generated from the round hole, so the form’s size, symmetry, and above all its concentricity to other part features depend on the drilled or bored pre-hole being round, on-size, and truly aligned with the spindle. A pre-hole that wanders or a holder that is off-axis produces a form that is oversize, lobed, or eccentric to the part’s OD. Rigid workholding, a sharp broach, and correct spindle speed and feed complete the recipe. When those boxes are ticked, a rotary-broached hex in a fitting is as functional as any other hex in the plant.
With linear broaching, quality is engineered into the tool. The accuracy of the finished spline or keyway reflects the broach’s own manufacturing accuracy—tooth-to-tooth pitch accumulation across a spline sets the cumulative index error, so broach grinding is where spline class fits are won or lost. Side relief on the finishing teeth controls whether the flanks are truly finished or merely rubbed: correct relief lets each finishing tooth shear a micro-thin final chip without smearing the surface, which is what delivers consistent surface finish and predictable tool life. Add a rigid machine, a well-aligned fixture, and correct cutting fluid, and the process repeats part after part with a drift measured in tenths over thousands of pieces.
When Neither Process Is the Right Answer
Two situations push both processes out of scope—or into specialized variants.
Very deep blind holes. Rotary broaching is capped near its 2×-diameter envelope, and conventional broaching through a blind bore demands broach design and chip evacuation that may not be practical—deep blind forms often migrate to wire EDM or specialized plunge processes regardless of volume.
Hardened workpieces. Above roughly 50 HRC, conventional broaching tooling reaches its practical limit—standard M-2 and PM high-speed steel teeth wear at unacceptable rates. The answer is not to abandon broaching but to switch to hard broaching, a dedicated practice using engineered substrates and coatings to broach hardened surfaces directly; we treat it in depth in our article on hard broaching vs soft broaching. The strategic point for process planners: if your part is hardened before the form operation, the rotary-vs-linear comparison above is really a hard-broaching-vs-alternatives comparison, and it should be run that way from the start.
Frequently Asked Questions
Is wobble broaching the same thing as rotary broaching?
Yes. “Wobble broaching” describes the same 1-degree-tilt, corner-shearing process—the name simply comes from the visible wobble of the broach in its holder. “Rotary broaching” and “hex broaching on a lathe” refer to the same technique.
Can rotary broaching replace a broaching machine?
For shallow-to-moderate internal hex and square forms within the roughly 2×-diameter depth envelope, yes—and at low-to-medium volumes it is the cheaper way to make them. It cannot replace linear broaching for deep forms, large cross-sections, internal gear teeth, or high-takt production lines; those remain squarely in dedicated-machine territory.
Which process is more accurate?
Both hold 0.0005″-class accuracy when properly executed. The difference is where the risk lives: rotary broaching accuracy depends on the pre-hole and machine alignment, while linear broaching accuracy is built into the broach’s tooth geometry, pitch accuracy, and side relief, then maintained by machine rigidity and fixture alignment.
What materials can be rotary broached?
The common machinable families: low-carbon and alloy steels, stainless steels, aluminum, brass, and similar bar-stock materials, including the titanium alloys used for medical screws. As workpiece hardness climbs, tool life falls quickly; beyond roughly 50 HRC, conventional broaching tooling of both kinds gives way to hard broaching practices.
Need Forms Beyond the Rotary Envelope? That Is What Broaching Machines Are For
The rotary-vs-linear decision usually resolves itself in the part print: if the form is a modest hex or square within the 2×-diameter depth envelope, wobble broaching on your existing lathe or machining center is the fast, low-capital route. The moment your requirements move past that—deeper forms, larger cross-sections, internal splines and gears, or production volumes measured in the hundreds of thousands—you are in dedicated broaching machine territory, where a single stroke produces the complete form in seconds with per-part costs no general-purpose process can touch.
Explore our broaching machine lineup to see vertical and horizontal configurations sized for your parts, or use our broaching machine selection guide to match tonnage, stroke length, and machine type to your forms—and send us your part print for a process recommendation and quote.


